How to Check Your PC Specifications Using CMD
Have you ever been in a situation where you needed to know the detailed hardware specifications of your computer but didn’t want to download or install third-party applications? Whether it’s for an upgrade, troubleshooting, or simply verifying information when buying a used device, knowing your PC or laptop specifications is crucial.
Many people might immediately think of opening Settings or using graphical tools like Task Manager. However, there is a faster, more efficient way that provides deeper information for those familiar with the Windows environment: through the Command Prompt (CMD). This native Windows tool holds a wealth of commands that allow us to interact with the system on a lower level.
According to reports from various tech forums, the Command Prompt method is often the preferred choice for technicians and advanced users due to its speed and its ability to provide raw, accurate data. Let’s explore the easy steps to check your PC specifications using CMD.
Initial Step: Opening Command Prompt
Before diving into the core commands, make sure you know how to access CMD:
Press the Windows + R keys simultaneously to open the Run dialog box.
- Type cmd and then press Enter.
Alternative: Click the Search icon on the Taskbar (or press the Windows key), then type Command Prompt and select the application.


Once the black CMD window is open, you are ready to execute the following commands.
Method 1: Using the systeminfo Command
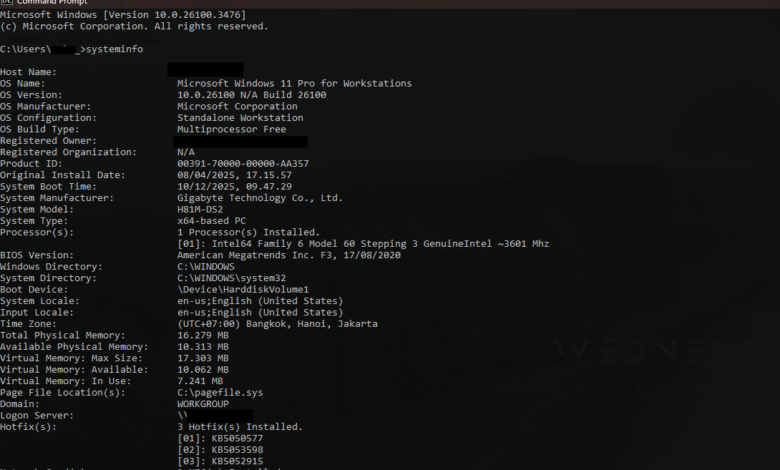
The systeminfo command is your main weapon for obtaining a comprehensive summary of your system configuration. This is the most popular way to check computer specifications via CMD.
How it Works:
In the Command Prompt window, type the following command:
systeminfoPress Enter.
The system will begin collecting data; this process may take a few seconds. Once finished, you will see a long list of information covering almost every aspect of your system.
Key Information Displayed:
| Category | Information Obtained |
| Operating System | OS Name, Version, Build, System Type (32-bit or 64-bit). |
| Processor (CPU) | Processor Details, Number of Cores, Speed. |
| Memory (RAM) | Total Physical Memory, Available Physical Memory. |
| Networking | Network Card details and IP configuration. |
| Virtualization | Status of Hyper-V or other Virtualization. |
Example RAM and OS Data:
| Detail | Value |
| OS Name | Microsoft Windows 11 Home |
| OS Version | 10.0.22621 N/A Build 22621 |
| Total Physical Memory | 8,192 MB (or 8 GB) |
| Available Physical Memory | 3,567 MB |
| Processor(s) | 1 Processor(s) Installed. [01]: Intel64 Family 6 Model 142 Stepping 12 GenuineIntel ~2808 Mhz |
Method 2: Using the wmic (Windows Management Instrumentation Command-line) Command
For more specific and focused information on hardware, the wmic command offers greater flexibility. It allows us to retrieve specific data without having to sift through a long output like that of systeminfo. This wmic command is highly effective for checking specific laptop or PC specs in a modular way.
1. Check CPU Details (Processor):
To find the specific CPU model and speed, use:
wmic cpu get name, maxclockspeed, cores, logicalprocessors
This command will display the processor name, maximum speed in MHz, number of cores, and number of logical processors (threads).
2. Check Total RAM (Memory):
To find the total installed physical memory (RAM) in bytes (you need to divide this by $1024^3$ to get GB):
wmic ComputerSystem get TotalPhysicalMemory
Tip: If the result is too large, you can use another command to get the value in KB:
wmic ComputerSystem get TotalPhysicalMemory /Value | find "TotalPhysicalMemory"
3. Check Hard Disk (Disk Drive):
To see the model and size of the installed Hard Drive or SSD:
wmic diskdrive get model, size
Similar to RAM, the result will be in bytes.
4. Check Motherboard Details:
If you want to know the baseboard (Motherboard) details like the manufacturer and model:
wmic baseboard get product, manufacturer
FAQ (Frequently Asked Questions)
Q: Do I need administrative rights to run these commands?
A: Generally, you do not need administrator rights (Run as Administrator) to run systeminfo and most wmic commands that only read system information. You can run them from a standard CMD window.
Q: What is the main difference between systeminfo and wmic?
A: systeminfo provides a quick and comprehensive report on almost everything in one view. Meanwhile, wmic is more modular; you need to know what specific property you want to view (cpu, diskdrive, baseboard), and it is ideal for users who only want to see certain hardware parts.
Q: How can I save the results of checking computer specifications to a text file?
A: You can redirect the output to a text file using the > operator. For example:
systeminfo > pc_specifications.txt
A file named pc_specifications.txt will be created in the directory where you ran CMD, containing all the output results.
Conclusion
Mastering basic CMD commands is a valuable asset for every Windows user. With simple commands like systeminfo and wmic, you can quickly view your PC specifications, whether it’s for installing new games, performing a memory upgrade, or simply knowing the System Type when contacting support. According to a CNN report, knowing your system configuration precisely can significantly cut down on troubleshooting time.
There is no longer any need to rely on third-party applications; the capability to check computer specifications using CMD is readily available, fast, and always accurate.