Understanding “Disable HW Overlay” and Its Real Impact on Your Device

If you’ve ever browsed through the Developer Options on Android or tinkered with Graphics Settings in Windows, you might have come across a term called “disable HW overlay.” It sounds technical—and it is—but understanding how it works can actually help you improve performance or fix display glitches.
This article explains what hardware overlay (HW overlay) means, what happens when you disable it, and whether doing so helps or harms your device. We’ll explore both Android and Windows sides, along with insights from trusted sources such as Android Developers, Microsoft Docs, and community experts from XDA Forums.
What Is a Hardware Overlay?
In simple terms, a hardware overlay is a layer of the display that lets the system render images efficiently using dedicated video memory. According to Microsoft Docs, “a hardware overlay is a dedicated area of video memory that can be overlayed on the primary surface, without modifying data in the primary surface.”
This means the overlay is drawn directly by the hardware—your GPU—without needing extra processing from the CPU. On Android, overlays are managed by a system service called SurfaceFlinger, which decides how different layers (apps, UI elements, videos) appear on screen.
When overlays are active:
The device uses less CPU power, since rendering is handled by hardware.
Battery consumption tends to be lower.
Graphics performance is more consistent, especially during video playback or animations.
What Does “Disable HW Overlay” Actually Do?
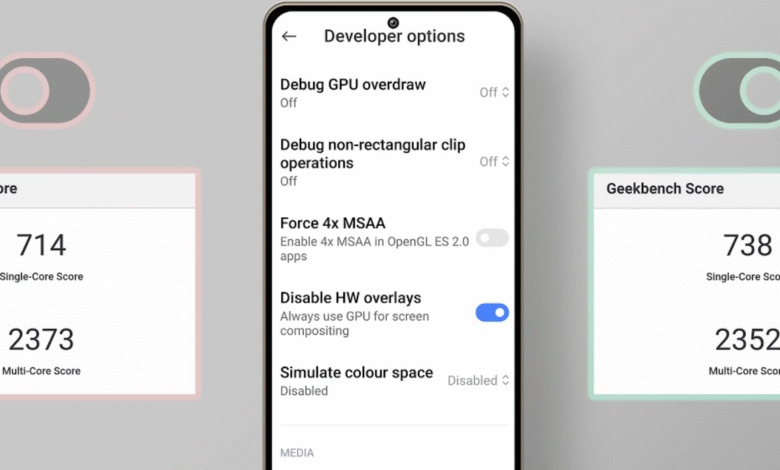
When you disable HW overlays, your device stops using the hardware layer to draw images and instead forces everything to go through GPU rendering.
According to Android Developers documentation, “disabling hardware overlays forces apps to share video memory and constantly check for collision and clipping, which increases processing power usage.” In short, disabling it:
Can reduce flickering or glitching on certain apps.
But also increases GPU workload and may cause faster battery drain.
For example, users sometimes toggle “Disable HW overlays” when they notice screen artifacts or inconsistent frame rendering. It’s commonly used for debugging or testing device performance, but rarely recommended for daily use.
When to Turn Off HW Overlays (Android)
While it might sound like a quick fix for visual bugs, you should disable HW overlays only in specific cases. Here are a few legitimate reasons:
| Situation | Why Disabling HW Overlay Helps |
|---|---|
| Screen flickers or visual tearing | Forces GPU rendering, which can stabilize the display |
| Debugging app performance | Developers use it to detect composition issues |
| Testing GPU driver compatibility | Helps isolate rendering problems |
| Rooted device experiments | Used in advanced tweaks via Magisk modules |
However, community discussions on XDA Forums warn that “disabling overlays may break certain features like in-display fingerprint sensors on some devices.” So, while it can help diagnose problems, it shouldn’t remain enabled permanently.
How to Disable HW Overlays on Android
Here’s a simple step-by-step guide:
Open Settings → About Phone → Tap Build Number seven times to unlock Developer Options.
Go back and open Developer Options.
Scroll down to Hardware Accelerated Rendering.
Toggle “Disable HW overlays” to ON.
Once active, your device will rely entirely on the GPU to render all layers. You may notice smoother performance in certain situations—but also increased heat or battery drain if used long-term.
Related Concepts: Force GPU Rendering and Hardware Acceleration
It’s important not to confuse disable HW overlay with Force GPU Rendering or Hardware-Accelerated GPU Scheduling (HAGS) found in Windows.
Force GPU Rendering: Makes Android apps use GPU rendering even if they weren’t designed for it.
Disable HW Overlay: Stops the system from using the hardware layer, forcing GPU to render everything.
HAGS (Windows): Allows the GPU to manage its own memory directly, potentially improving gaming performance.
Each setting deals with how graphics are handled, but they target slightly different processes.
Disabling HW Overlay in Windows
While the term is most popular in Android discussions, Windows has a similar concept. In Windows 10 and 11, you can control GPU composition using the Hardware-accelerated GPU scheduling setting.
As MajorGeeks explains, you can turn it off by:
Going to Settings → System → Display → Graphics Settings.
Selecting Change default graphics settings.
Toggling Hardware-accelerated GPU scheduling OFF or ON.
Restarting your PC for changes to apply.
This is essentially Windows’ way of enabling or disabling hardware overlays and GPU memory management. Disabling it may help fix stuttering or unstable frame pacing in games but could also slightly lower performance in some systems.
Performance Impact of Disabling HW Overlays
The impact varies by device and driver version, but we can summarize the common outcomes:
| Effect | Description | Typical Result |
|---|---|---|
| CPU usage | Higher, since it must handle more rendering | Slightly increased load |
| GPU workload | Much higher | Possible heat and power drain |
| Battery life | Lower due to sustained GPU activity | Reduced endurance |
| Display stability | Sometimes improves | Fixes flicker or color layering issues |
| System temperature | Tends to rise | Can affect thermal throttling |
Android Stack Exchange contributors point out that “disabling overlays increases GPU usage and battery consumption, and developers generally don’t need to turn it on for normal use.”
In short, it’s a diagnostic tool, not a performance booster.
Why Screenshots Miss Overlays
If you’ve ever wondered why some video overlays (like pop-up captions or floating elements) don’t appear in screenshots, that’s due to how overlays are rendered.
As Wikipedia notes, “hardware overlays are drawn on a separate buffer that isn’t part of the primary surface, so screenshot tools capture only the main layer.” This explains why some DRM-protected content, such as Netflix videos, show a black box when captured.
Advanced Use: Rooted Devices and Magisk Modules
Power users often experiment with Magisk modules or scripts to automatically disable HW overlays on boot. According to community discussions on XDA, “custom scripts can be applied via init.d or Magisk to force overlays off, though this may break display calibration or fingerprint sensors.”
These tweaks are meant for testing, debugging, or optimizing custom ROMs, not for regular consumers. Unless you’re familiar with system-level configuration, it’s better to avoid forcing such behavior.
The Safe Recommendation
Most manufacturers and developers—including Android Developers—recommend keeping HW overlays enabled by default. The feature exists to:
Improve display efficiency.
Balance GPU and CPU workloads.
Prevent unnecessary power drain.
Disabling it may temporarily solve a problem, but it also removes a key optimization that modern OSes depend on.
Summary Table: Pros and Cons of Disabling HW Overlays
| Pros | Cons |
|---|---|
| May fix flickering or screen tearing | Increases GPU power usage |
| Helps in debugging graphics layers | Can drain battery faster |
| Useful for identifying rendering bugs | May cause overheating |
| Enables testing GPU behavior | May break some visual features |
Conclusion
Disabling HW overlays is a powerful but double-edged option. It can help diagnose visual issues or performance anomalies on Android and Windows, but it’s not meant for daily use. By forcing the GPU to handle every frame, you might gain smoother visuals temporarily—but at the cost of energy efficiency and long-term stability.
In general, keep it enabled unless you’re troubleshooting. As summarized by Android Developers and Microsoft Docs, hardware overlays exist to make your device’s display pipeline more efficient—not more complicated.
If you encounter flickering or performance issues, toggle it temporarily, test your results, and then revert to default settings for optimal balance.


